“Water-popping-What it is, and why it should be considered.”
We found that water popping hardwood is a technique that many flooring companies and finishers simply don’t use when finishing hardwood floors. It’s one of the reasons why we stand out from the rest. We don’t consider water-popping to be an “additional step,” we consider it a “necessary” one, when staining is involved.
Staining and finishing any type of hardwood is a process that requires a lot of TLC, to say the least. Our experts take great care when performing each and every step of the finishing process. From the first pass of our sanding equipment, to the final coat of poly, our wood floor finishers focus on every last detail to ensure a quality and stunning final product. Our ultimate goal is providing our clients with a floor that they absolutely love.
What is Water-Popping?
Water-popping is an added step in the finishing process. This step is applied to hardwood flooring that is going to receive a stain. It’s where a thin, even layer of misted water is applied to freshly sanded hardwood before the stain is applied. We know it may sound crazy; the idea of actually putting water on a hardwood floor, however, we believe it to be a crucial part of the finishing process for hardwood floors that are to be stained, and not kept natural.
What the water-popping technique does to the hardwood
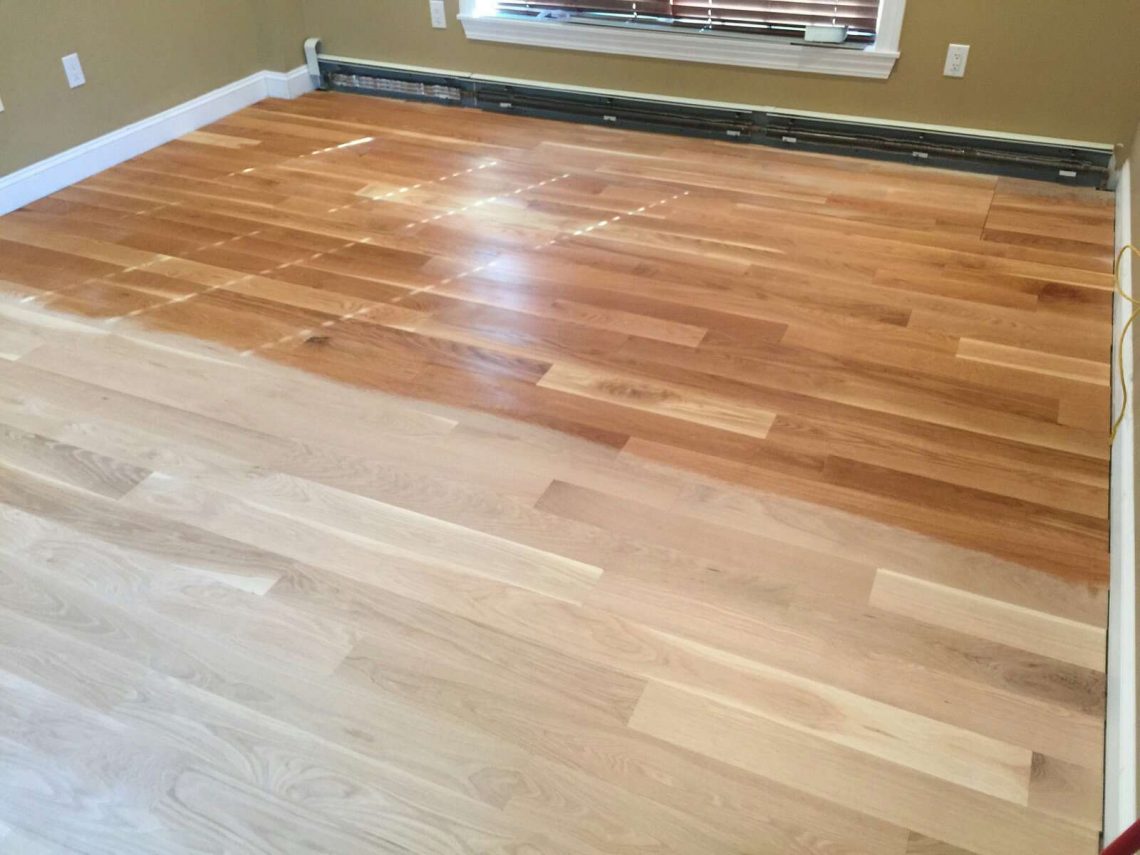
The water-popping technique re-opens the natural graining of the wood, ultimately allowing for a more evenly absorbed stain color. Because the sanding process consists of multiple passes with different grit levels, each more fine than the one before it, the woods graining naturally closes. This doesn’t mean that staining a hardwood floor without water-popping it isn’t possible; it simply means that the final product will have a more even tone, and a deeper, richer color. You’ll notice that there is an incredibly drastic difference in how well hardwood absorbs the stain color when a floor is water-popped. If you were to take one piece of wood, sand it, water-pop only half, then stain the entire piece, the difference in color is really surprising. You’d see that the water-popped half has a deeper, darker, richer color than the half not water-popped. Applying this technique makes a big difference when a dark stain color is desired.
When the Water-Popping step is most necessary
This additional step is added to the finishing process when the hardwood flooring is going to receive a stain color; especially dark stain colors. The water-popping process helps ensure your newly finished floors produce a beautiful, rich color, and most importantly, an even coverage. If the flooring is going to be kept natural (without a stain color) the water-popping step isn’t necessary.
Why we water-pop our floors
Our experienced floor finishers have done countless sanding and refinishing projects, producing beautifully site-finished floors of all colors and sheens. We add the water-popping step to ensure the quality of the final product. Without water-popping the hardwood, the stain has the potential of having botchy color, due to uneven absorption. Remember, every species of hardwood is different and unique in its own make-up. For example, the natural graining in Oak hardwood varies greatly from the graining in Pine or Maple, and it’s the responsibility of the hardwood finisher to understand the species’ characteristics and how it will absorb the stain in order to guarantee a beautiful final product. A water-popped hardwood floor drastically improves the wood’s ability to absorb stain, leaving the floor with a beautifully deep, bold color. Applying this technique is the best way to ensure a gorgeous final product, and, in doing so, ensuring our clients will love their floors.
How it’s done
Water-popping is its own separate step in the finishing process. It’s done by applying a mist of water to the already sanded hardwood floor, and lightly wiping it up. It sounds simple, but there are actually a lot of variables that are really crucial in doing it correctly. Here’s the step by step process:
Once the floors have been completely sanded, they get vacuumed and their moisture content is tested and measured. We measure the moisture content before water-popping to use as a point of reference to let us know when they’re ready for stain. The hardwood flooring isn’t ready for stain to be applied until the moisture content is the same as it was before the mist was applied.
We like to use a handheld pump-sprayer with natural spring water to mist the hardwood. The floors are then wiped with a clean rag on the end of a dry mop in the same direction of the woods grain. This is done row by row, completing each row from one end of the room to the other. Because water-popping works so well to open the grains of the hardwood, it’s crucial that it isn’t walked on while wet. Once the mist is applied and wiped, the graining is open, making it susceptible to dents and surface scratches. Even walking on a water-popped floor with heavy boots may leave a boot print that won’t be seen until the stain is applied! At that point, the floor would have to be re-sanded. (This is the “TLC” part of the finishing process we mentioned above, and also why our floor finishers generally apply stain in their socks, or with soft sneakers.) It is also really important that the mist is sprayed evenly over the entirety of the floor. Any spot of flooring that may have been missed will be incredibly noticeable and much lighter in color than the other areas that were successfully water-popped.
Once this step is completed, the hardwood floors are ready to be stained and finished.
If you have any questions on the water-popping process or any other step of the finishing process, remember, I’m here to help guide you to a beautiful finished product. Feel free to contact me with any of your finishing questions at info@theflooringblog.com
Hope you enjoyed this post!
*Lisa

54 Comments
Pingback:
Pingback:
Pingback:
Pingback:
Pingback:
Pingback:
Pingback:
Pingback:
Pingback:
Pingback:
Pingback:
Pingback:
Pingback:
Pingback:
Pingback:
Pingback:
Pingback:
Pingback:
Pingback:
Pingback:
Pingback:
Pingback:
Pingback:
Pingback:
Pingback:
Pingback:
Pingback:
Pingback:
Pingback:
Pingback:
Pingback:
Pingback:
Pingback:
Pingback:
Pingback:
Pingback:
Pingback:
Pingback:
Pingback:
Pingback:
Pingback:
Pingback:
Pingback:
Pingback:
Pingback:
Pingback:
Pingback:
Pingback:
Pingback:
Pingback:
Pingback:
Pingback:
Pingback:
Pingback: